
Viewshed and live sightlines
A Viewshed layer answers one question: what can be seen from here? It works from observer points, such as a mast, a wind turbine or a camera, and from the feature layers you want to test, usually buildings. It holds no data of its own, so you need a point layer or a target layer already on the map.
It works in two ways:
| Visibility overlay | Live sightlines | |
|---|---|---|
| Best for | Screening which features can see a site | Exploring and presenting: drag a point and watch the city respond |
| Ground | Terrain, from an elevation model | Flat ground, with 3D terrain off |
| What blocks the view | Terrain, and optionally buildings | The buildings in your target layers |
| Result | A shaded overlay, plus a result per target | Each wall and roof lit where it has the view |
| Readers can move the observer | No | Yes, by dragging or with the arrow keys |
| Charts and slicers | Can cross-filter | Not available |
Results are for screening, not surveying. Treat them as a zone of theoretical visibility: they do not account for haze, weather or anything that is not in your data.
Add the layer
Choose Viewshed when you add a layer, then set:
- Observers layer: the points visibility is measured from. Any Circles, Icons, 3D columns, 3D models or Heatmap layer works. Observer height (m) sets how high the eye is, or use Observer height column to read a height per point. Which observers limits the analysis to some of them.
- Target layer: the layer to test, usually buildings. Geometry and Shapes from file layers work in both modes, and Vector tiles layers work with live sightlines only. Height column and Default target height (m) give each feature its height.
- Radius (m): how far to look from each observer. The default is 5,000 m.
Visibility overlay
This is what you get unless you turn on live sightlines. Icon Map shades the ground that has a view and works out a result for each target feature.
- Compute visibility on chooses the elevation model. A surface model includes tree canopy and buildings, so it screens views that a bare-earth model would call visible.
- Buildings block visibility extrudes a target layer's footprints so they block each other, not just the terrain.
- Distance bands group targets by how far they are from the observer.
- Viewer eye height (m) sets the height tested at each target. Turn on Test at each target's roof height to count a target as visible if any part of it, up to its height, can be seen.
- Atmospheric refraction bends long sight lines slightly around the earth. 0.13 is the surveying standard, and 0 gives a straight line of sight.
- Nearest band color, Farthest band color and Opacity style the overlay.
- Cross-filter charts & slicers selects the visible targets, so the rest of the map filters to what can be seen.
Live sightlines
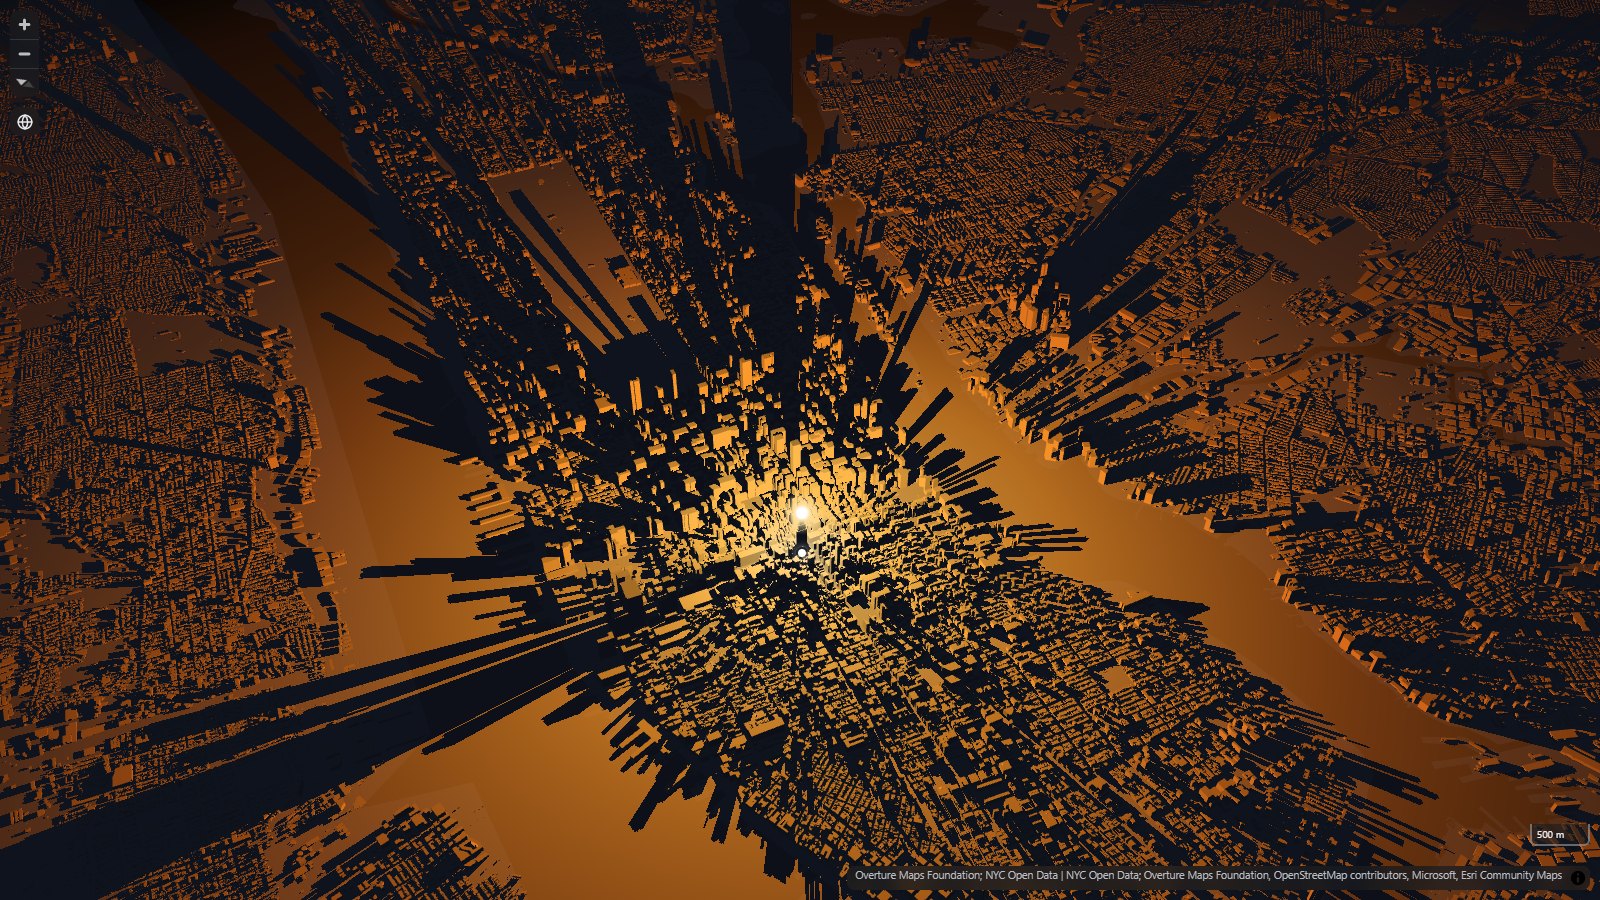
Turn on Draw live sightlines to replace the overlay. Every wall and roof in the target layers is lit only where it can see the observer, worked out on the reader's graphics card as the observer moves. It uses no building data beyond your target layers, and it works on published maps.
The observer appears as a ball of light at its height, above a small handle on the ground. Readers can drag either one, or focus it and use the arrow keys (hold Shift for longer steps). Turn off Let viewers drag the observer to fix it in place.
- Start longitude and Start latitude set where the observer begins. Leave them empty to start at the first observer, or at the center of the map.
- Color near the observer and Color far from the observer set the ramp along the radius.
- Color without a view sets the color of everything in shadow.
- Shadow opacity sets how solid those shadows are. Lower it to see the map through shadowed buildings. On lit ground it lets the light through, and at 0% the ground shadows are gone.
Light the ground
By default, open ground has only a faint glow, set by Glow on open ground. Turn on Light the ground to light open ground that has the view and lay the buildings' shadows across it, so a park or a square shows the shadow of every tower around it. Ground light strength sets how bright it is.
What happens to water depends on your basemap:
| Basemap | Without a land layer | With a land layer selected |
|---|---|---|
| A vector basemap with its own water | Water is left as it is | The light stays inside the land shapes |
| Empty, or another basemap with no water of its own | The light falls on water and land alike | The light stays inside the land shapes |
| A raster basemap | The light falls on water and land alike | The light stays inside the land shapes |
To choose a land layer, use Only light the ground inside this layer. It can be a Geometry, Shapes from file, Vector tiles or Catalog layer.
Lighting the water can look striking on a dark map, because the shadows reach across it. On a light basemap the land without a view goes dark out to the radius, while water in the basemap keeps its color.
Limits
- Flat ground only. Hills are not modeled. Live sightlines do not draw while 3D terrain is on.
- Mercator only. They do not draw on the globe projection.
- No results for charts or slicers. Use the visibility overlay when you need to cross-filter.
- Only loaded buildings count. Shadows come from the buildings loaded for the current view, so results can change as the view moves. On a first load, the ball appears straight away and the lighting follows once the tiles arrive.
- Dense maps drag more slowly. The more buildings are loaded, the more work each frame takes, so try your map on the kind of device your readers use.
- A modern graphics card is needed. The calculation needs WebGL 2 with floating-point rendering. Where WebGPU is available, the result sharpens when the observer stops moving.
The Visibility probe
You do not need a layer to let readers explore visibility. The Visibility probe in Map controls lets a reader click any point, then set a Structure height of up to 1,000 m and a Viewer eye height of up to 20 m. Elevation data is fetched as needed, so 3D terrain does not have to be on.
Turn on Offer live sightlines to add live sightlines to the probe. It uses the basemap's own buildings and any target layer you choose, so it needs no building data of your own, as long as your basemap has buildings. The same colors and Light the ground settings are in the Map controls dialog, and 3D terrain must be off.
Next steps
- Map controls: set up the Visibility probe.
- 3D scenes: more ways to bring buildings into a map.
- Selection & analysis: other tools for analyzing what is on the map.