
Map controls
Map controls are the buttons and panels drawn on top of the map: zoom buttons, the globe toggle, scales, the selection buttons, the layer control and more. You choose which ones your readers get in the User Interface card of the Format pane.
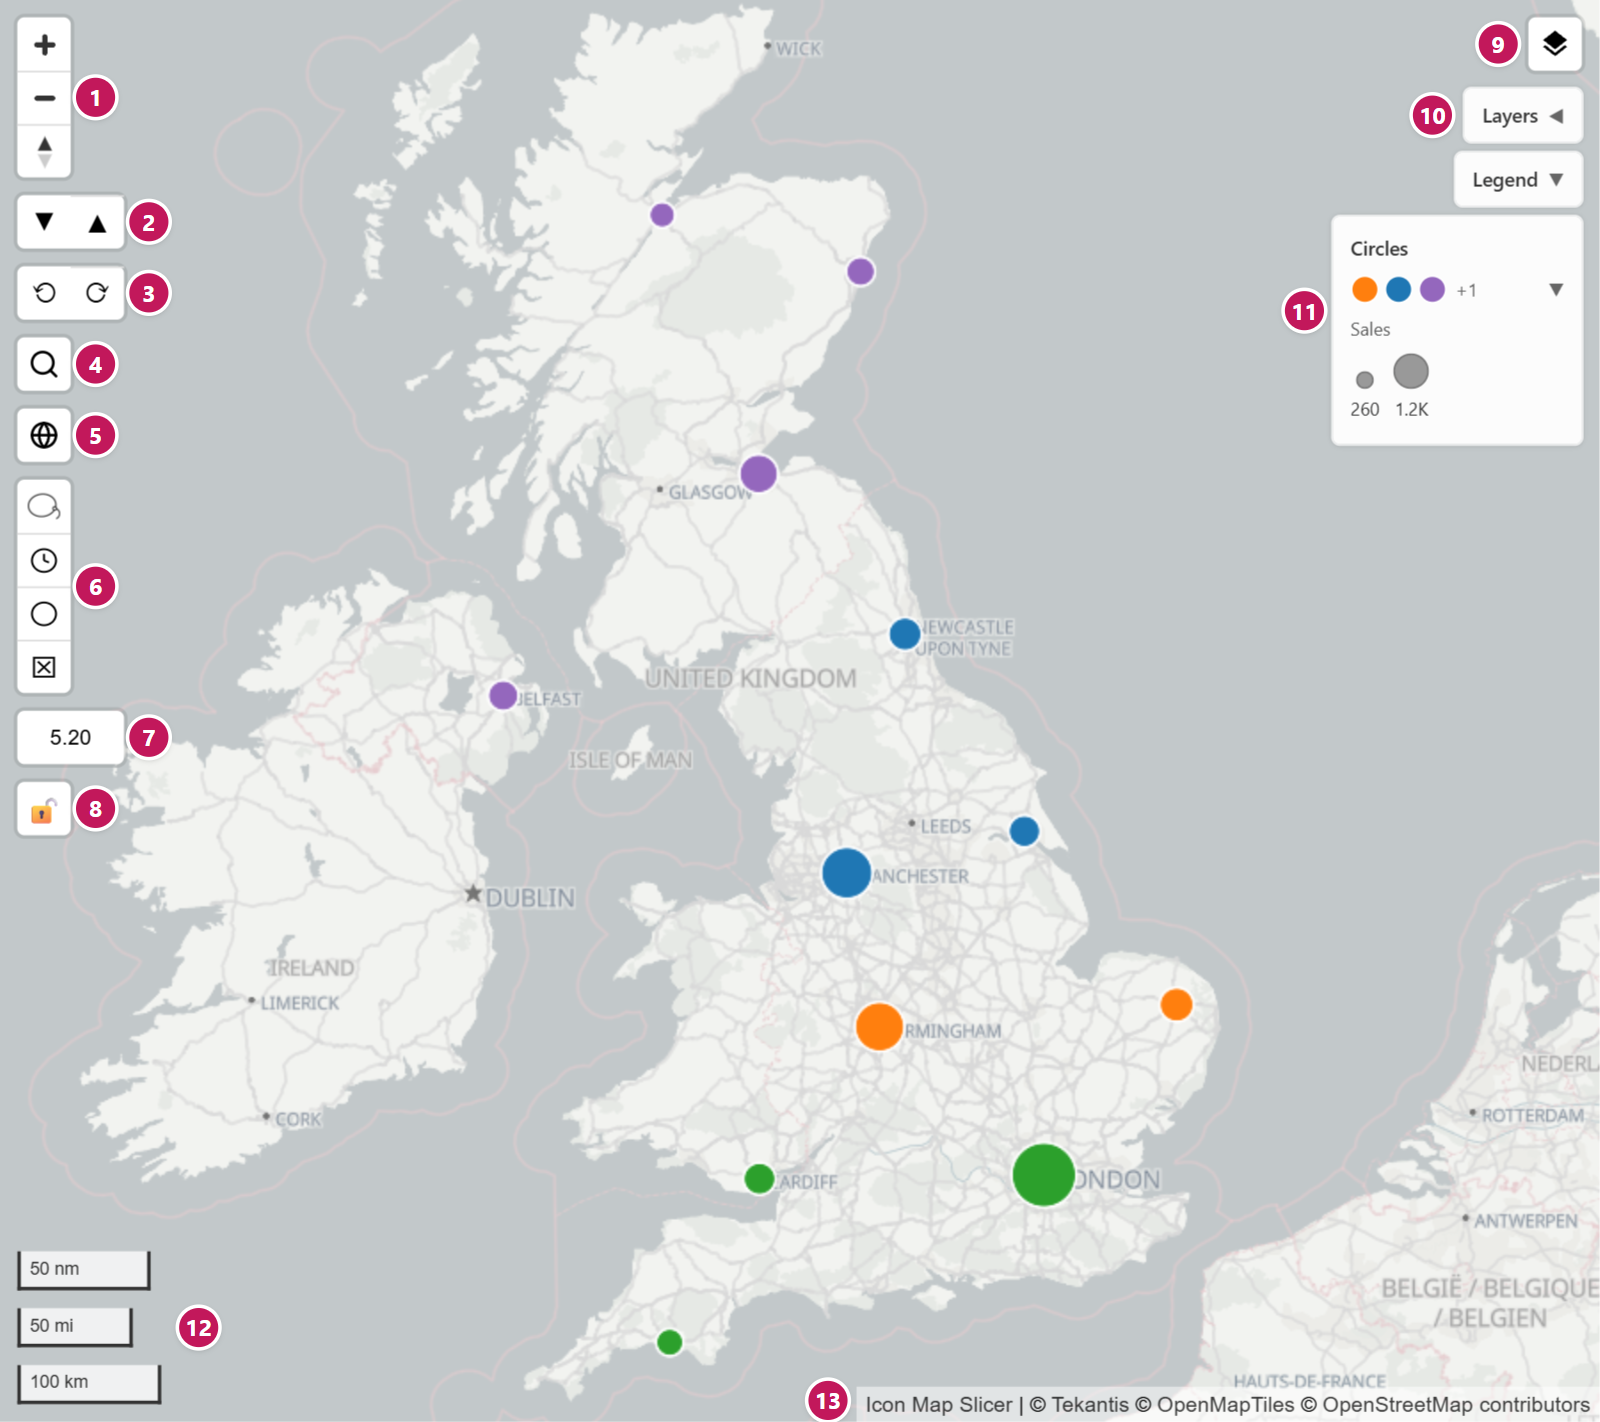
Switch controls on and off
- In the Format pane, open User Interface > Controls.
- Switch on the controls you want. A new map starts with Zoom, Pitch, Bearing and Imperial Scale on.
- Set Control Size to make the buttons larger or smaller.
The selection buttons (lasso, circle select and travel time) are switched on in the Selection card instead. See Selection buttons.
Controls work in both editing and reading view. Changes a reader makes with a control, such as switching to the globe or hiding a layer, last for their session and are not saved to the report.
Every control
| # | Control | Setting | What it does | Default |
|---|---|---|---|---|
| 1 | Zoom and compass | Zoom | + and - buttons, and a compass that shows which way the map is turned. Click the compass to turn the map back to north. | On |
| 2 | Pitch | Pitch | Two buttons that tilt the map down and up, 10 degrees at a time. Hidden on a map where tilting is switched off. | On |
| 3 | Bearing | Bearing | Two buttons that rotate the map left and right, 10 degrees at a time. | On |
| 4 | Search | Search | A search box for finding a place. The result is marked on the map. | Off |
| 5 | Globe toggle | Globe Toggle | One button that switches between the flat map and a 3D globe. | Off |
| 6 | Selection buttons | Lasso, Isochrone Select, Circle Select (on the Selection card), Clear Selections Button | Buttons for selecting by lasso, travel time and circle, and for clearing the selection. | Off |
| 7 | Zoom level | Display Zoom Level | Shows the current zoom level to two decimal places. Useful while you design a map and need a number for a zoom setting. | Off |
| 8 | Zoom lock | Zoom Lock | A padlock button that stops the map zooming to the data until it is clicked again. | Off |
| 9 | Basemap selector | Show basemap selector (1.1.0.9 and earlier: Show Layer Selector) | A button in the top right corner that opens a list of basemaps to switch between. | Off |
| 10 | Layer control | Show layer control (in the Layer control group) | A panel that lists the map's layers so readers can show and hide them. | Off |
| 11 | Legend | The Legend card | Explains colors, sizes and symbols. See Legend. | Off |
| 12 | Scales | Metric Scale, Imperial Scale, Nautical Miles Scale | A scale bar for each one you switch on, in any combination. | Imperial on, others off |
| 13 | Attribution | Additional Attribution | The credit line. Your text is added to the credits that are always shown. | Empty |
| - | Floor picker | None | Appears by itself when a layer holds indoor (IMDF) data with floors. Readers pick the floor to show. | Automatic |
Two more settings sit with the controls:
| Setting | What it does | Default |
|---|---|---|
| Projection | Mercator (flat) or Globe: the projection the map opens with. Clicking the globe toggle while you edit the report updates this setting. | Mercator (flat) |
| Control Size | The width and height of every control button, in pixels, 20 to 75. | 30 |
How each control works
Zoom and compass
The + and - buttons zoom one step. The compass turns as the map rotates and leans as it tilts; click it to face north again. The compass comes with Zoom and has no switch of its own.
Pitch and Bearing
Pitch adds Decrease Pitch and Increase Pitch buttons. Bearing adds Rotate Left and Rotate Right buttons. Each click moves the camera 10 degrees.
The Pitch buttons stop at the map's steepest tilt, 85 degrees unless you change Steepest tilt in the Basemaps dialog. When Tilt is switched off there, the Pitch buttons are hidden. See View, zoom and projection.
Globe toggle and Projection
The button's tooltip reads "Switch to globe view" or "Switch to flat map". While you edit the report, clicking it also saves the choice to Projection, so the report opens that way. For readers the switch lasts for the session. See View, zoom and projection.
Selection buttons
The selection buttons sit together in one group in the top left corner. Each appears when its setting is on:
| Button | Setting | Card | See |
|---|---|---|---|
| Lasso Select Tool | Lasso | Selection > User Selection | Click, lasso and circle select |
| Isochrone Select Tool (a clock) | Isochrone Select | Selection > User Selection | Select by travel time |
| Circle Select Tool | Circle Select | Selection > User Selection | Click, lasso and circle select |
| Clear All Selections | Clear Selections Button | User Interface > Controls, or Selection > User Selection | How Icon Map Slicer filters |
Clear Selections Button appears on both cards. The two switches are the same setting: change one and the other follows.
Zoom lock
The padlock is for readers. Its tooltip reads "Prevent auto zoom to data points" or, while locked, "Re-enable auto zoom to data points". While it is locked, the map stays where it is when the data changes, for example when another slicer filters the map. It lasts for the session.
Scales
The scale bars sit in the bottom left corner. Switch on any combination of metric, imperial and nautical miles.
Basemap selector
Show basemap selector (Show Layer Selector in 1.1.0.9 and earlier) adds a button to the top right corner that opens a panel of basemaps. Clicking one switches the basemap at once, in reading view as well as while editing.
New in 1.1.0.11
What the selector lists depends on how the map's basemaps are set up:
| Map | Button tooltip | The panel lists |
|---|---|---|
| A map with a basemap list (maps added in 1.1.0.11 or later) | Change basemap | Every basemap you added in the Basemaps dialog, from any provider, with the active one marked. Shown when the list has more than one basemap. |
| A map whose Map Source is Icon Map | Change Map Style | The Icon Map basemap styles. |
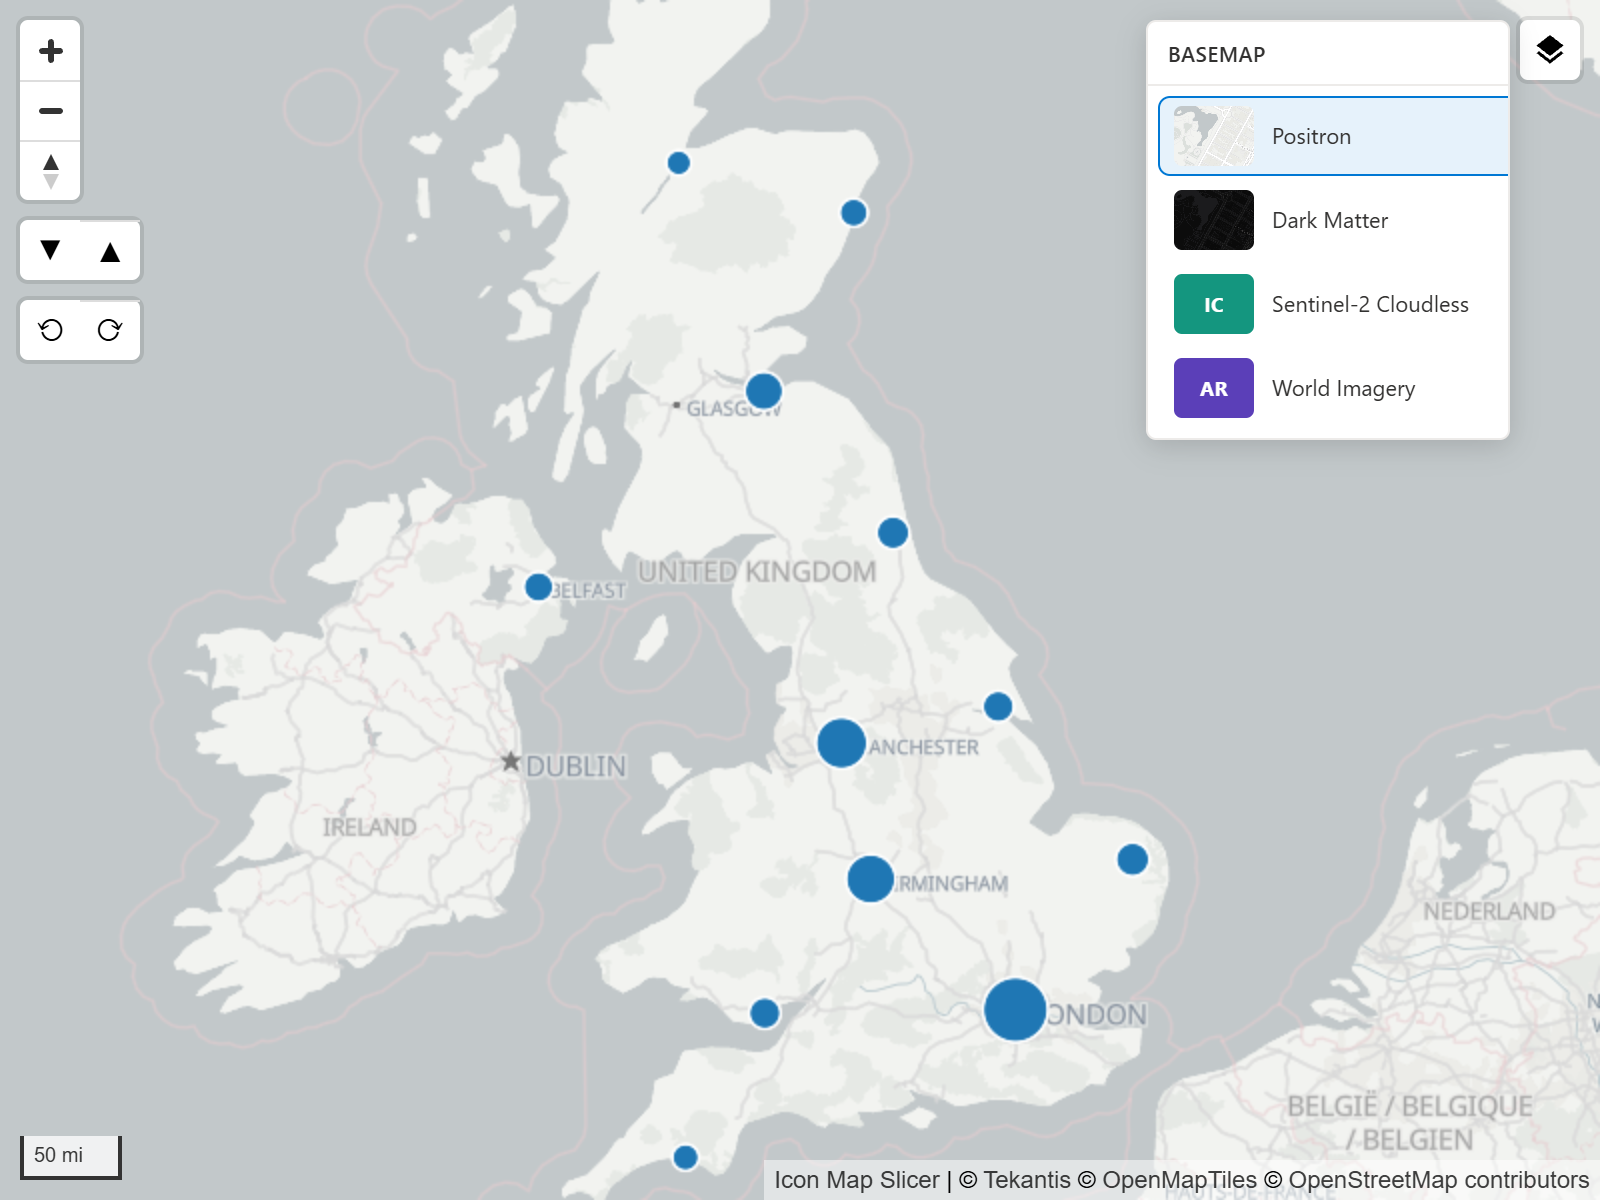
On a map with a basemap list, the same setting is also on the Background Layer card. A reader's choice lasts for the session. While you edit the report, your choice also becomes the basemap the map opens with. To choose which basemaps are offered, see The Basemaps dialog.
Attribution
The credit line sits in the bottom right corner. It always carries an Icon Map Slicer link and the credits of the basemap and layers in use. Text you type in Additional Attribution is added to it.
Layer control
The layer control is a panel listing the map's layers, so readers can show and hide them. Its settings are in Format pane > User Interface > Layer control.
| Setting | What it does | Default |
|---|---|---|
| Show layer control | Shows the panel. | Off |
| Position | Top left, Top right, Bottom left or Bottom right. | Top right |
| Title | Heading of the panel. | Layers |
| Allow show/hide | Lets readers switch layers on and off. Off shows a read-only list. | On |
| Start collapsed | The panel opens folded away. | On |
The panel lists the data layers and the Icon Map Catalog layers that are on.
It also lists GeoJSON / Shape / KML reference layers, under their title from the Legend card, their file name or "Reference layer 1" to "Reference layer 5", and ArcGIS layers, both the data layer and reference layers.
What readers show and hide lasts for their session only. Rename a row with the layer's title setting in the Legend card, and put each layer's legend inside its row with the legend's Display mode. See Legend.
Size and position
Control Size sets the size of every button at once. Each kind of control has a fixed corner:
| Corner | Controls |
|---|---|
| Top left | All the buttons: zoom and compass, pitch, bearing, search, globe toggle, the selection buttons, zoom level and zoom lock. |
| Top right | The basemap selector and the floor picker. The legend and the layer control start here too. |
| Bottom left | Scale bars. |
| Bottom right | Attribution. |
Only the legend and the layer control can be moved, each with its own Position setting. Neither can be dragged.
The rest of the User Interface card
The Tooltips group of this card holds Combine Tooltips. See Tooltips.
Tips and limits
- There is no distance tool, full screen or locate-me control. Use Power BI's focus mode to enlarge the visual.
- The travel time panel opens to the right of the top-left buttons. Leave room for it on a narrow visual.