
The Basemaps dialog
The Basemaps dialog is where a new map chooses its basemaps. You build a list from any mix of sources, star the one the map opens with, and decide whether readers can switch between them on the map.
Before you start
The dialog is available on maps that were added to a report as a new, empty visual in Icon Map Slicer 1.1.0.11 or later. Maps added earlier, and reports built in Icon Map Lite, keep the Background Layer card in the Format pane. Basemaps overview explains the rule and how to check which one your map has.
You need to be editing the report. Readers cannot open the dialog.
Open the dialog
Use any of these:
- Format pane > Background Layer > Basemaps > Configure Basemaps. Switch it on to open the dialog. The switch turns itself off again.
- In the Layer Manager, on the Map background card, select Choose basemaps.
- In the Layer Manager's layer stack, select Configure on the basemap row at the bottom.
The Basemaps group in the Format pane also shows a one-line summary of the list, for example "3 basemaps; the map opens with Standard.", and the Show basemap selector switch.
Change the basemap: the quick path
- Open the dialog. The Basemaps tab lists the basemaps the map offers.
- Select + Add a basemap and choose where it comes from, for example Icon Map.
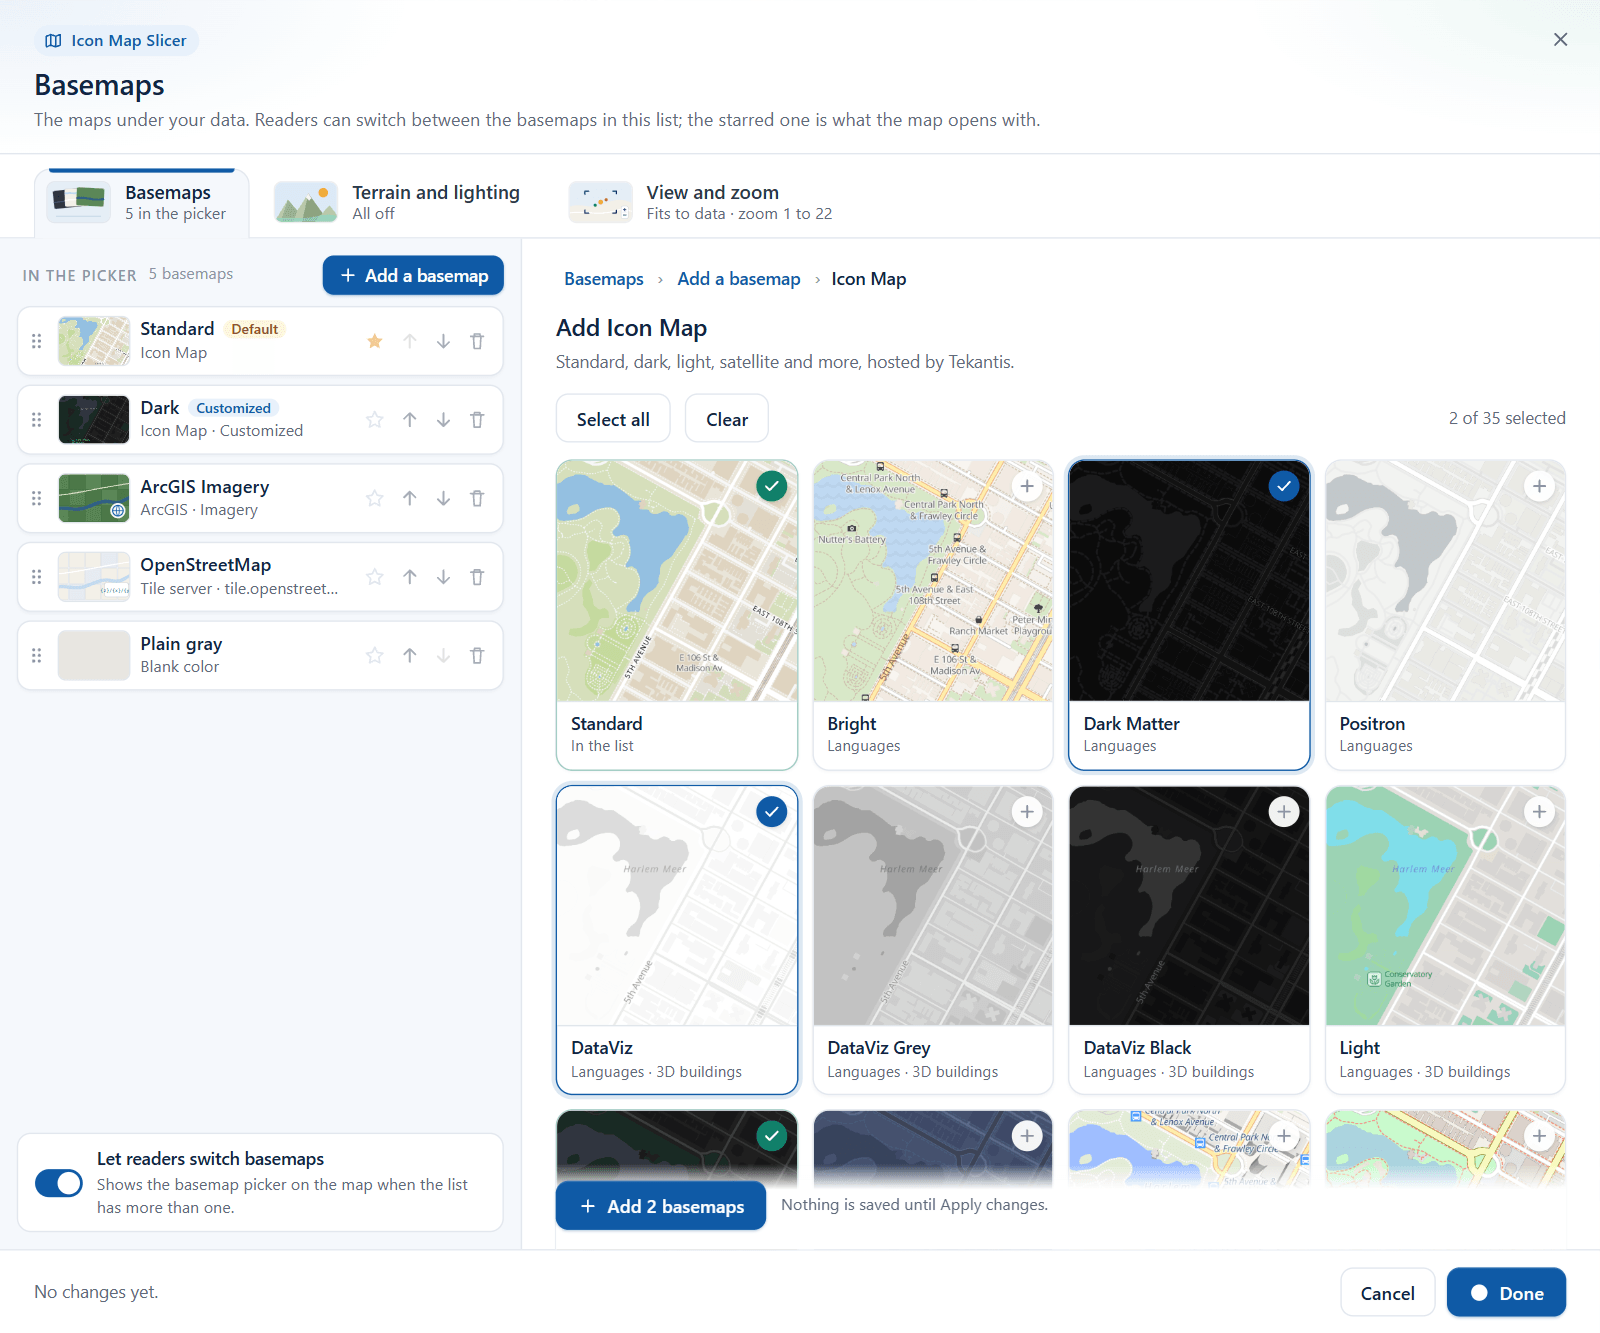
- Tick one or more styles, then select Add 1 basemap (the button shows how many you ticked).
- In the list, select the star on the basemap the map should open with.
- Select Apply changes.
Nothing is saved to the report until you select Apply changes. Cancel, the close button and Esc discard what you did. Inside an inner view, Esc steps back one level first.
A tour of the dialog
The dialog has three tabs.
| Tab | What it holds | Described in |
|---|---|---|
| Basemaps | The basemap list, the add flow and each basemap's options | This page |
| Terrain and lighting | Hillshade, 3D Terrain, Light and Sky. These belong to the map, not to one basemap | Terrain, hillshade, sky and lighting |
| View and zoom | Fit to data, selections, zoom range, projection, tilt, the map's edges (wrapping the world and keeping readers inside an area) and animation | View, zoom and projection |
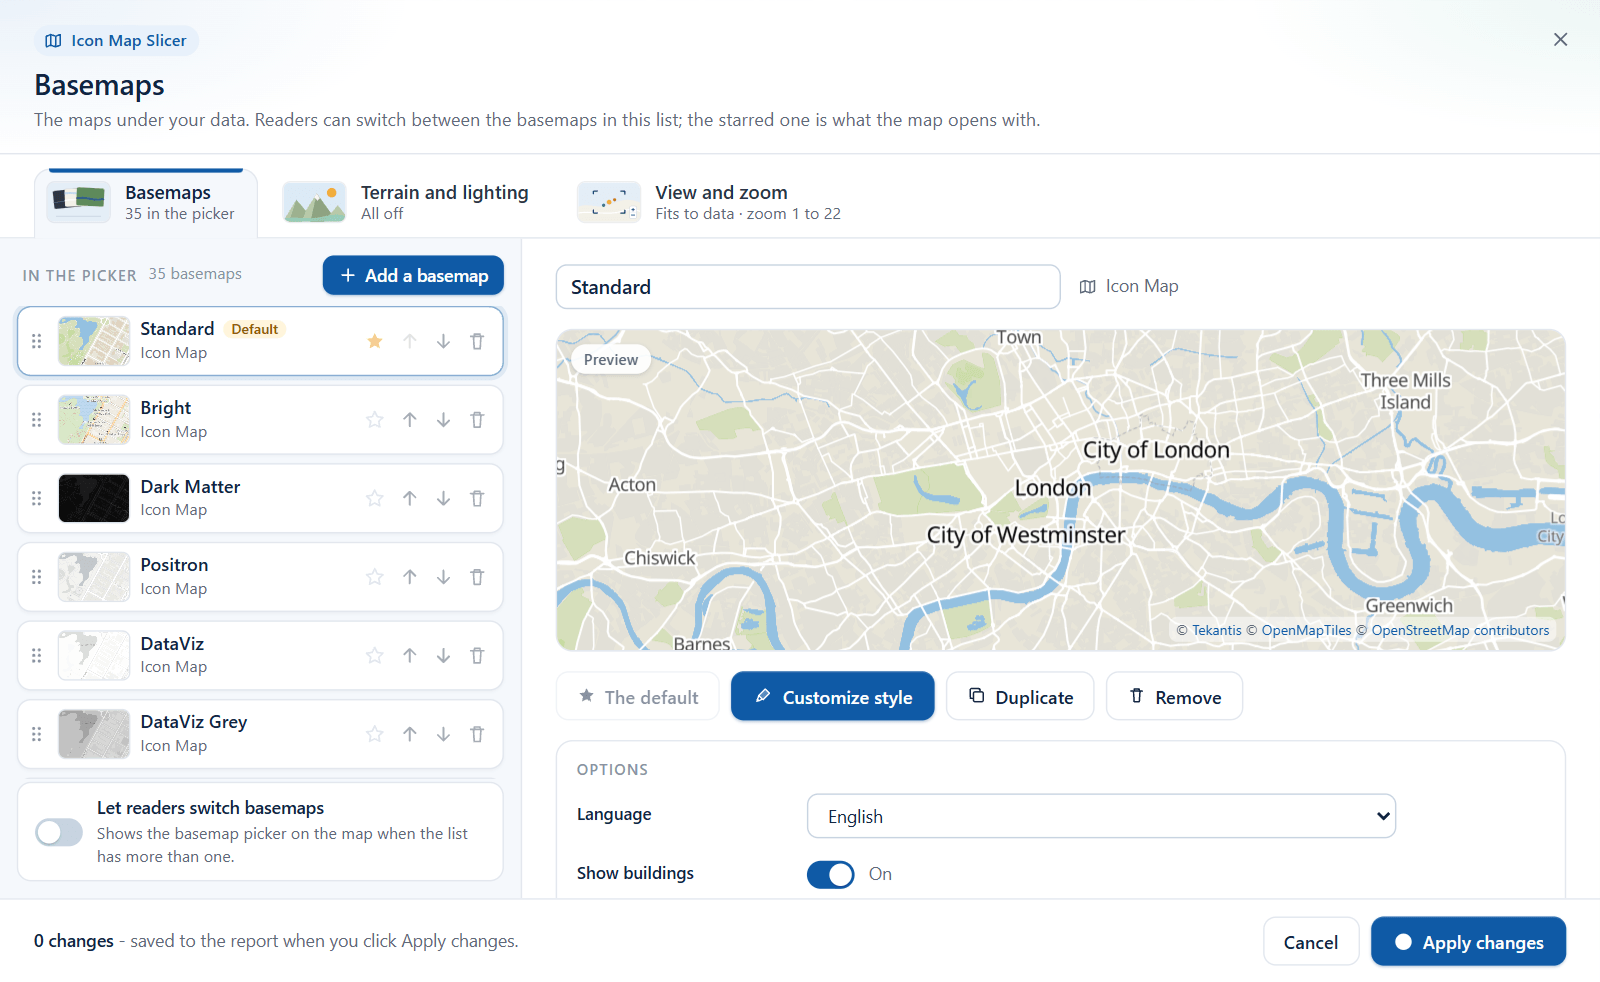
The footer shows what will happen: "No changes yet.", or the number of changes waiting to be saved. The main button reads Done when nothing changed and Apply changes when something did. The first time you open the dialog, before a list has ever been saved, the footer reads "0 changes - saved to the report when you click Apply changes." and the main button reads Apply changes.
The first time you open it
Until you save a list, the dialog shows a list worked out from the map's current background: every Icon Map style, with the current one starred.
The map keeps drawing exactly what it drew before until you change something and select Apply changes.
The basemap list
The left column, headed In the picker, is the list. Its order is the order readers see in the basemap picker.
Each row shows a thumbnail, the basemap's name, and a line saying where it comes from, for example "ArcGIS · Imagery" or "Tile server · tile.example.com". Two badges can appear: Default on the basemap the map opens with, and Customized when you have edited its style.
| To do this | Do this |
|---|---|
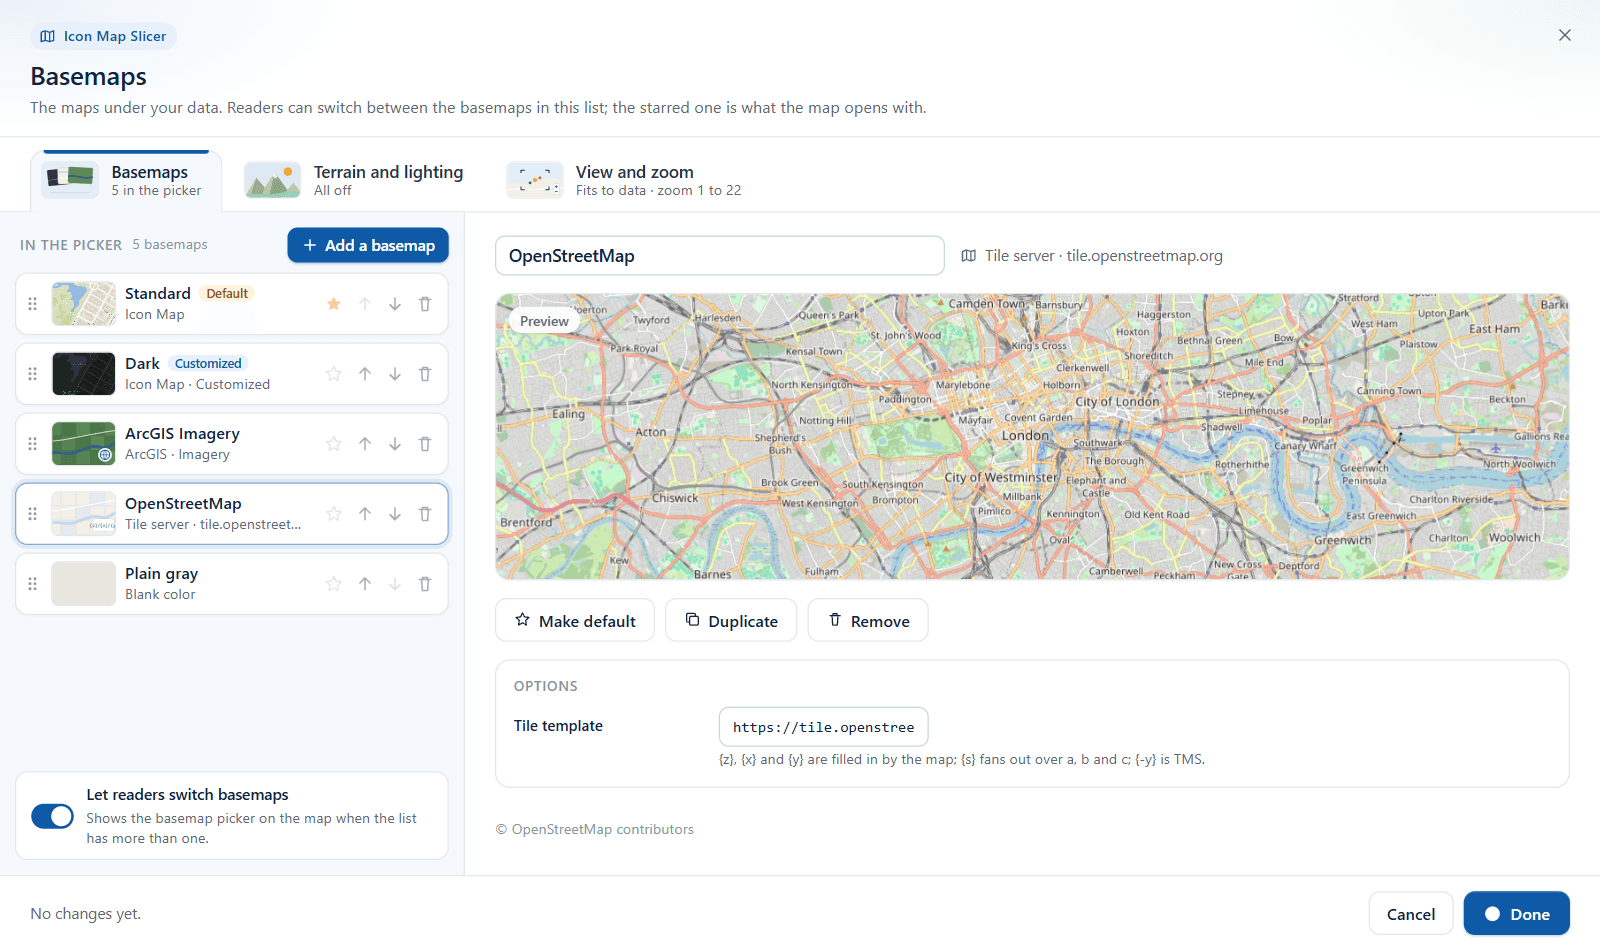
| Edit a basemap | Select its row. The right side shows its preview and options |
| Set the default | Select the star on its row, or Make default in the edit view |
| Reorder | Drag the grip, use the up and down arrows, or press Alt+Up / Alt+Down on a focused row |
| Remove | Select the bin on its row, or Remove in the edit view. The last remaining basemap cannot be removed |
| Let readers switch | Switch on Let readers switch basemaps under the list |
Add a basemap
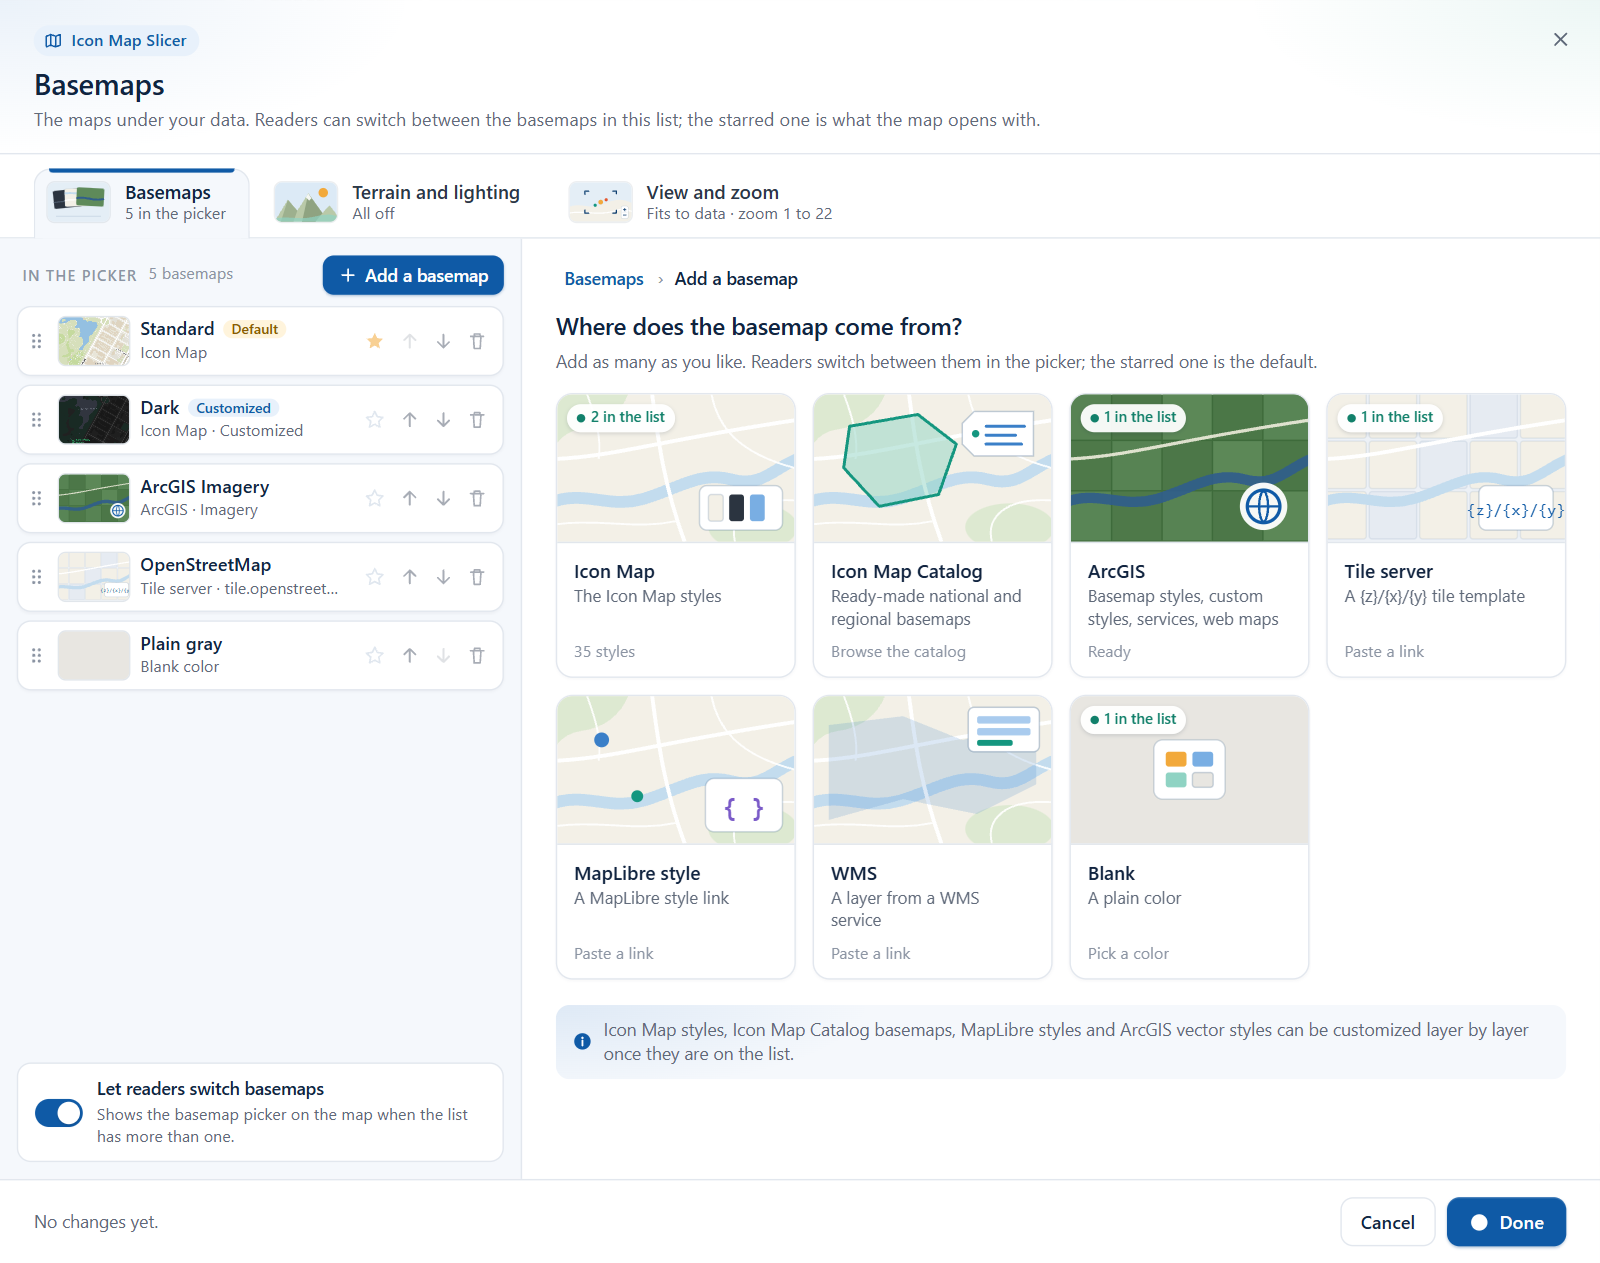
Select + Add a basemap. The dialog asks Where does the basemap come from? and shows a tile for each source, with a status line such as "Ready", "Needs an ArcGIS key or sign-in", "Paste a link" or "Pick a color".
| Tile | What it adds |
|---|---|
| Icon Map | The Icon Map styles, hosted by Tekantis. No key needed |
| Icon Map Catalog | National and regional basemaps from the Icon Map Catalog. Hidden when Airgapped Environment is on |
| ArcGIS | Basemap styles, custom styles, tiled services and web maps from ArcGIS Online or Enterprise |
| Tile server | Any XYZ tile server, from a tile template link |
| MapLibre style | A style document that you host |
| WMS | A layer from a WMS service |
| Blank | A plain color and no map |
You can add as many as you like. Adding the same basemap twice is refused: "This basemap is already in the list."
Icon Map styles
The Icon Map tile opens a gallery of the styles. Tick the ones you want, or use Select all and Clear. Each card notes whether the style supports Languages and 3D buildings. Styles already in your list show "In the list".
The styles are listed in Icon Map basemap styles.
Icon Map Catalog basemaps
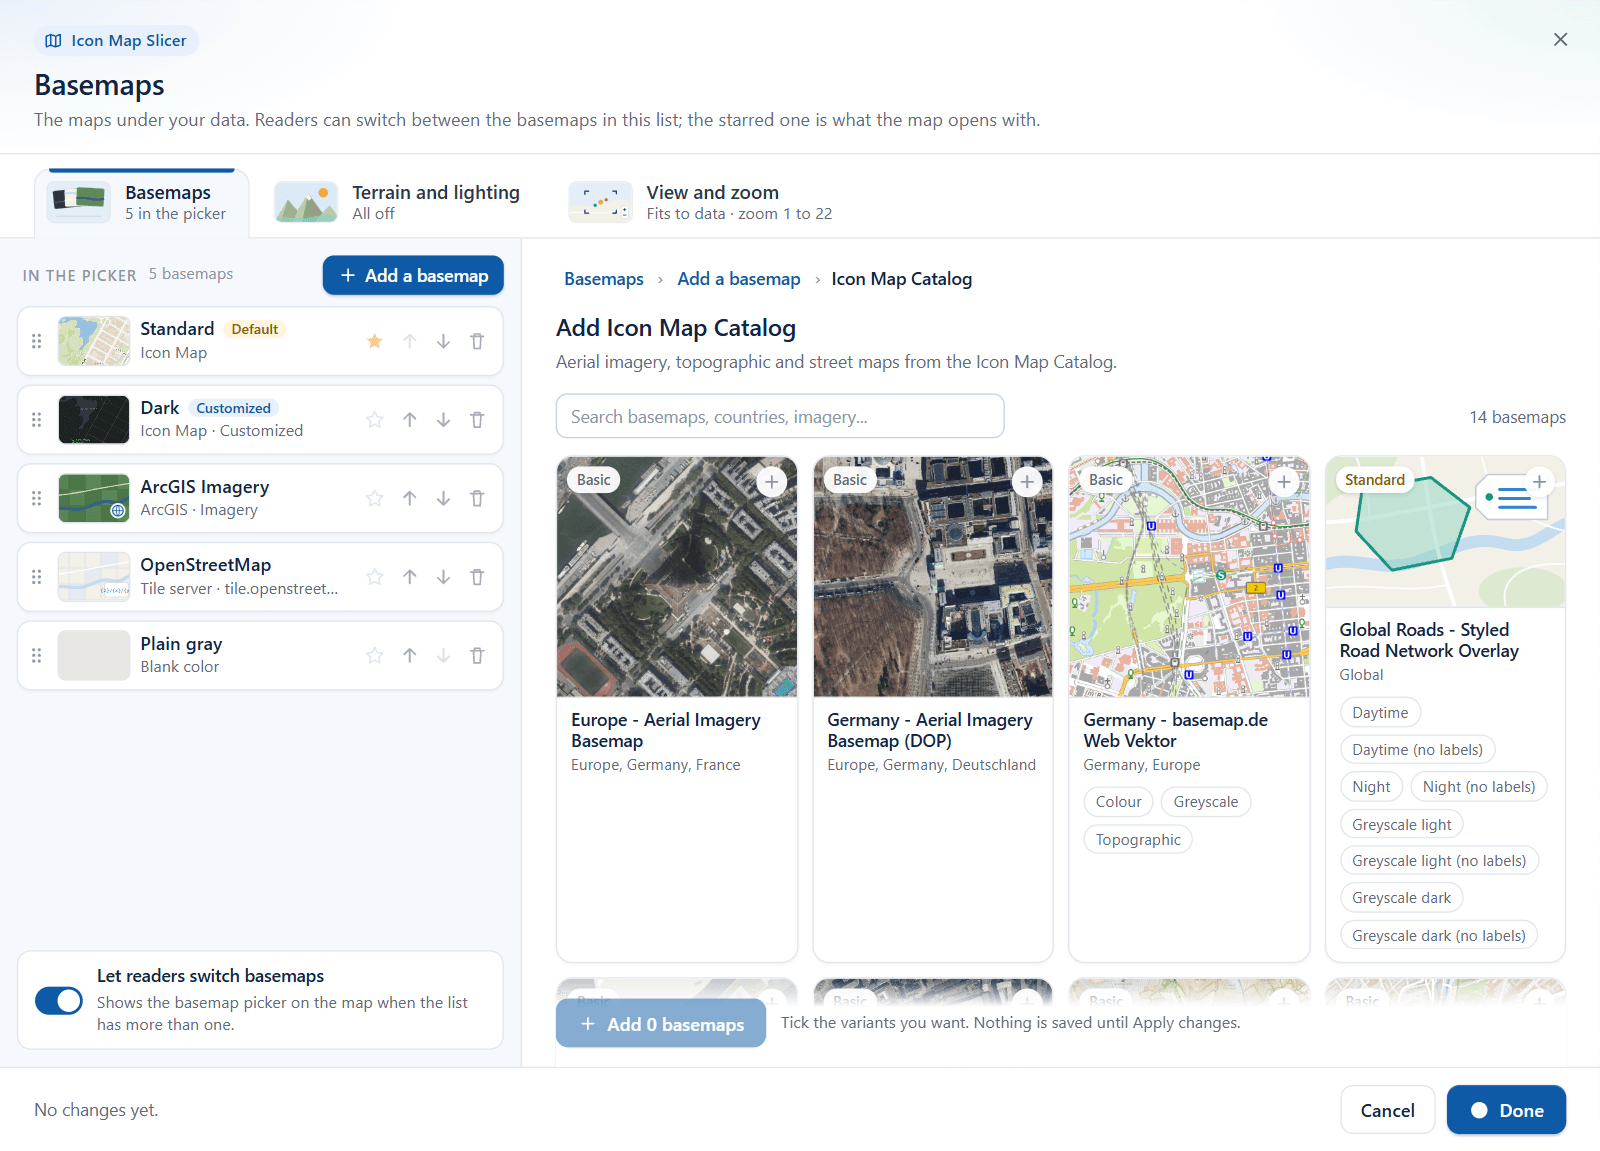
The Icon Map Catalog tile opens a screen headed Add from the Icon Map Catalog, which reads the catalog live. Search by name, country or kind of imagery. Each card is a family of basemaps with a badge for its tier: Basic, Standard, Premium or Commercial. When a family has several styles, tick the variants you want. A variant is added with the name "family - variant".
Basic basemaps need nothing. For a Standard, Premium or Commercial basemap, the dialog notes that it draws with the report's Icon Map license.
Other sources
Every other tile opens a short form with the source's Options and Add to the list. When the button is disabled, the line beside it says what is missing, for example "Enter the link." or "Check the link and pick a layer."
The options for each source are described in Other basemap providers.
Links are checked before they are added
Tile server, MapLibre style and WMS take a link. Select Check and the dialog reads it and tells you what it found.
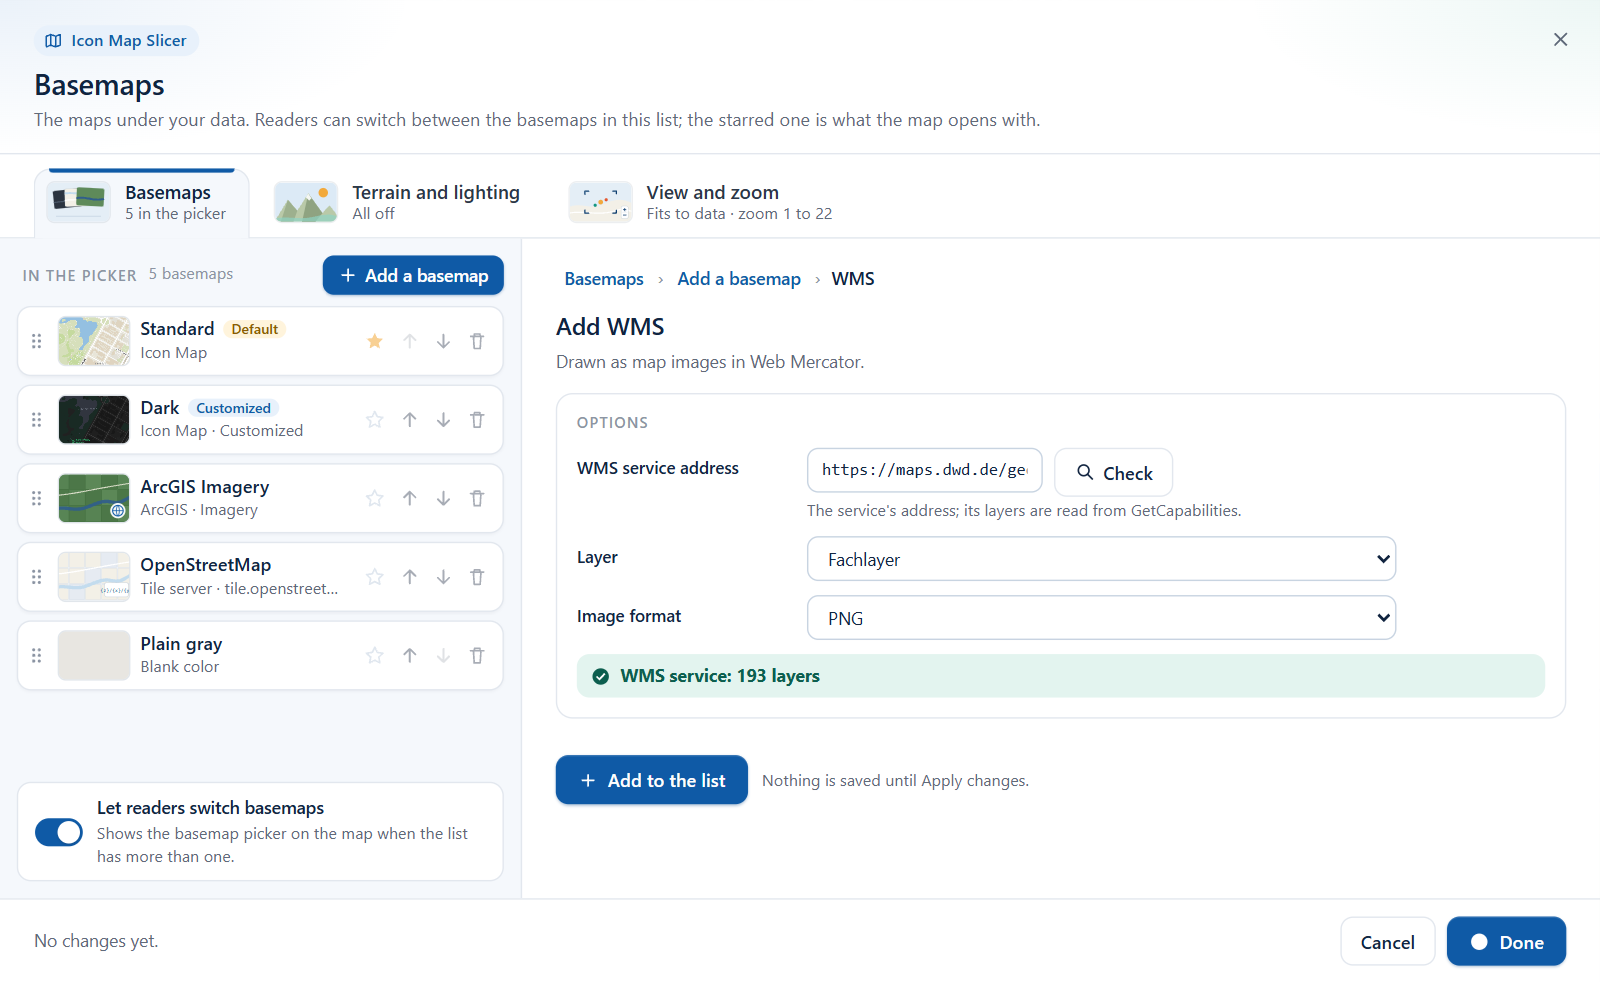
| Source | When the link is good | When it is not |
|---|---|---|
| Any | "The link must start with https://" | |
| Tile server | "Tile template: a test tile loaded" | "Not a tile template" when the link has no {z}, {x} and {y}. If the test tile cannot be read, the link is still added with a warning, because many tile servers refuse that kind of test but draw correctly |
| MapLibre style | "MapLibre style: 42 layers" and the style's name | "Not a MapLibre style", "The server answered ..." or "The link could not be read" |
| WMS | "WMS service: 12 layers", and the Layer dropdown is filled | "No layers found in the service" or "This server does not allow Power BI to read it" |
A server that does not allow Power BI to read it is blocked by its CORS rules. The map could not draw from it either, so the dialog refuses the link.
Connect to ArcGIS
The ArcGIS form shows a Connect to ArcGIS card. Use it to choose how the report reaches ArcGIS: Sign in with ArcGIS, API key, App credentials or Username and password. What you choose is written to the ArcGIS Authentication card in the Format pane, and you can change it later in either place. Esri's basemap styles need the connection. A public tiled service and a style given by its URL draw without one, in the preview and on the map. A web map with public layers draws without one on the map; web maps are not shown in the preview.
See Connect to ArcGIS and ArcGIS sign-in and the proxy.
Edit a basemap
Select a row to see its edit view.
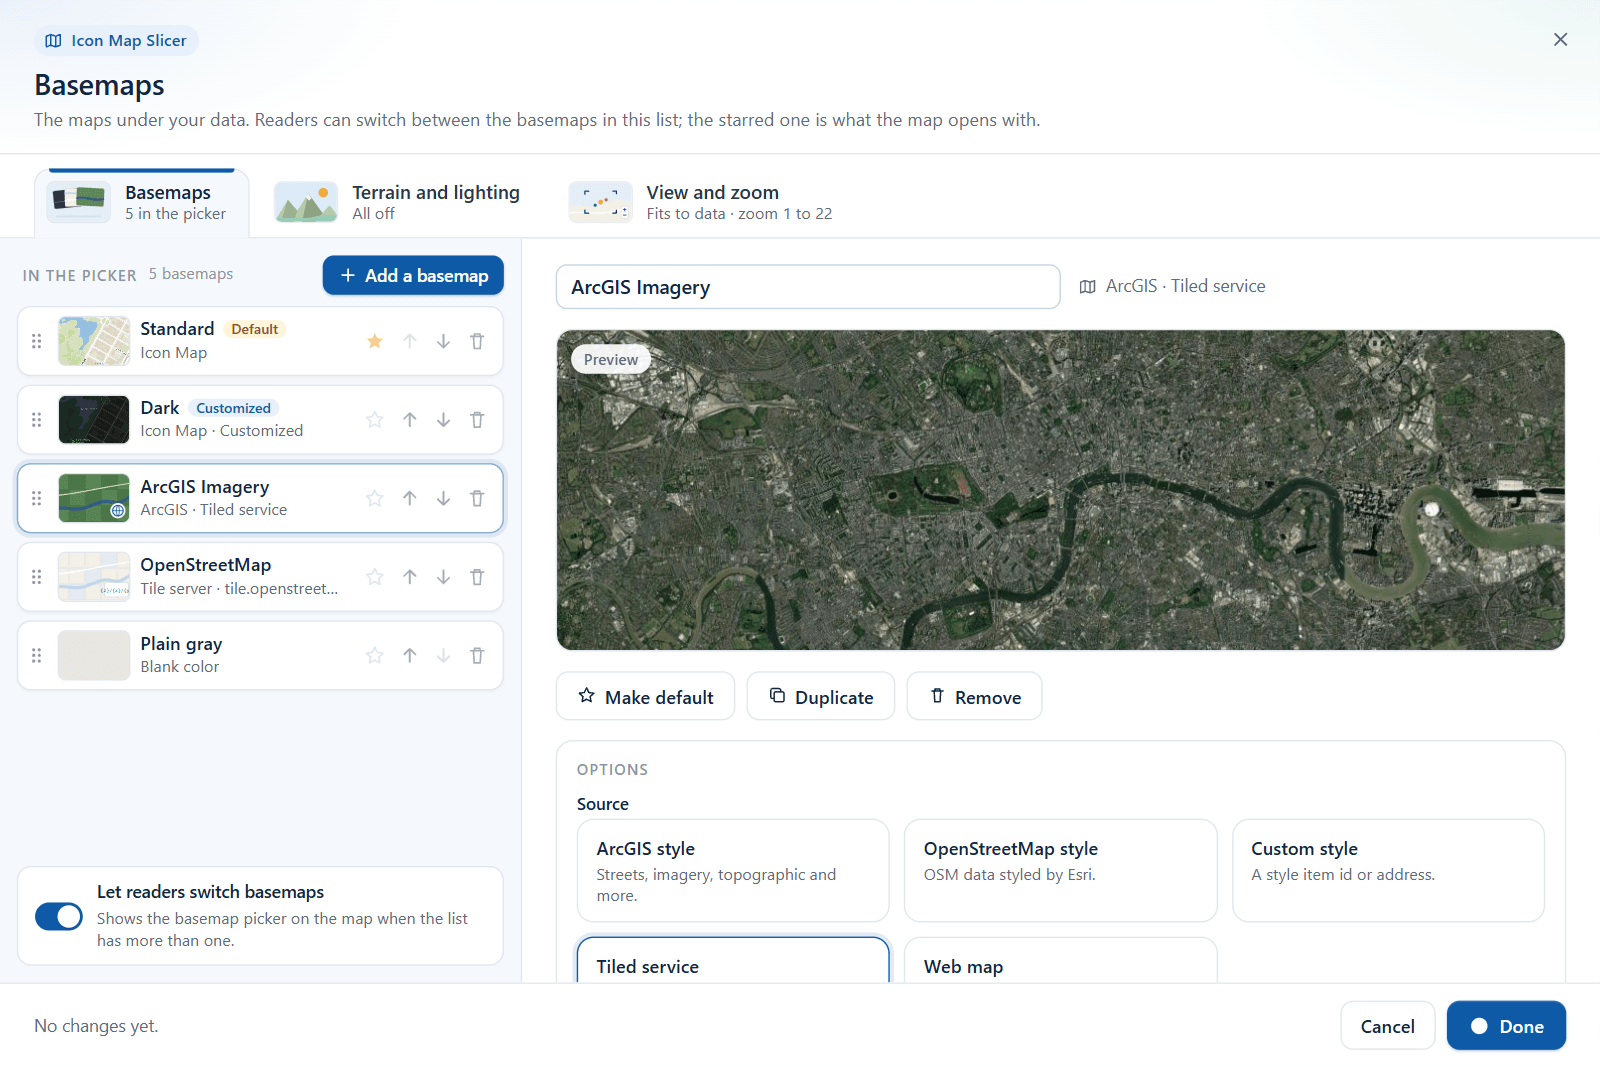
The buttons depend on the kind of basemap. The ArcGIS tiled service above is made of pictures, so it has no Customize style button.
- Name: the name readers see in the picker. Change it to anything you like.
- Preview: a live map of this basemap at the report map's current position, drawn flat, without 3D terrain or hillshade. Some basemaps cannot be previewed in the dialog, for example a paid catalog basemap or an ArcGIS web map. A note says so, and the basemap still draws on the map.
- Make default: the map opens with this basemap. On the entry that is already the default, the button reads The default and is disabled.
- Customize style: opens the style editor, on basemaps that can be customized. It reads Edit style once you have made changes, and Reset style removes them. See Customize a basemap style.
- Duplicate: adds a copy named "name copy" right after the original. Use it to offer the same style twice, for example in two languages, or to keep the original beside a customized version.
- Remove: takes it off the list.
- Options: the source's settings for this basemap. For a catalog basemap this section is About this basemap, with its description, source and license.
Options belong to the list entry, not to the source. Two entries of the same Icon Map style can have different languages or different 3D building settings. An Icon Map entry's Language starts on Report language, so its place names follow the report's language. Choose English to keep English names whatever the report's language.
The basemap picker for readers
When the list has two or more basemaps and Let readers switch basemaps is on, the map shows a picker button in its top right corner (tooltip "Change basemap"). It opens a panel headed BASEMAP with a thumbnail and name for each entry.
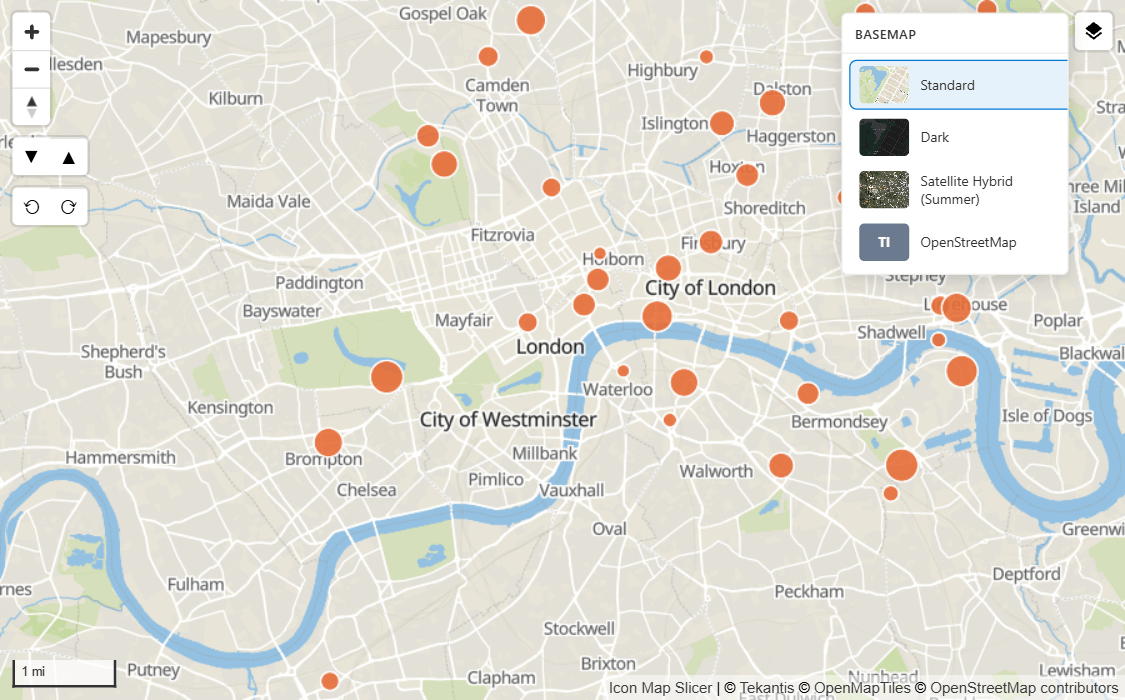
- A reader's choice lasts for their session. It is not saved.
- While you are editing the report, choosing a basemap in the picker also makes it the list's default.
- Let readers switch basemaps is the same setting as Show basemap selector on the Background Layer card and on the User Interface card.
The picker needs a saved list. If you have never selected Apply changes in the dialog, it does not appear.
Thumbnails
Icon Map and catalog basemaps come with their own thumbnails. For any other basemap, the dialog captures a small picture from the preview when you select Apply changes. A basemap that was never previewed shows a colored tile with the source's initials in the picker, and a Blank entry shows its color.
Tips and limits
- Terrain, hillshade, light, sky, zoom and tilt do not change when a reader switches basemap. They belong to the map.
- Once a list is saved, the list drives the map. The earlier single-basemap settings are left as they were, but no longer used.
- Power BI shows one dialog at a time. When a step needs another window, such as Browse ArcGIS, an ArcGIS sign-in or the Icon Map Catalog's elevation picker, the Basemaps dialog closes and reopens afterward on the same view with your unsaved changes intact.
- When you open the dialog from the Layer Manager, the Layer Manager reopens when you finish.
- The dialog cannot type a credit line for a tile server or WMS basemap. Add the provider's credit in Format pane > User Interface > Controls > Additional Attribution.
- A basemap list made in Icon Map Pro can hold Azure Maps, Mappable or Ordnance Survey basemaps. Icon Map Slicer still draws them, using the keys saved in the report, but you cannot add new ones here.